Product description

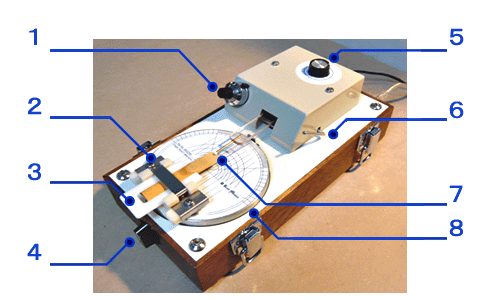
1: Vernier dial
Adjusts vertical positioning on graph.
2: Reed holder
Turn over to analyze/adjust back side of reed as well.
3: Center plate
Aligns center portion of reed. Choose from 6 plates for optimal fit.
4: Dial to adjust horizontal position of probe
5: Dial to adjust vertical position of probe
Adjusts the amount of pressure on probe tip, chaenging sensitivity of graph measurments.
6: Probe releas lever
Raises probe to avoid contact with reed when not in use (chenging or turning over reed).
7: Probe tip
8: Rotation table
Rotate manually. Stop to adjust rigidity of problematic fibrovascular bundle.
How to adjust a reed with Reed Meister
1. Place reed in the reed holder
- Soak reed in water for few minutes to moistened.
- Set reed on the center plate using the reed holder.
- Align the tip position of the reed with a ruler.
- Close the band of holder to hold the reed position.
- Turn over to check if the reed is set properly on the holder.
2. Insert the reed holder onto the rotation table
- Insert the reed holder onto the rotation table.
- Phsh in along the guide until it stops.
- Pull down the probe lever, placing the probe in contact with the reed.
- Begin measuring the front side of the reed.
- Rotate the table to measure the surface rigidity of the reed.
- Reed Meister connected to a PC via USB port.
- Actual unevenness is displayed on the monitor
3. Measurement and adjust reed front surface
- This particular reed is almost symmetrical having concave in the center.
- Make a cut on the top left side of the fibrovascular bundle of the reed.
- Rotate the table left to right to see the effect.
- Repeat the adjustment until the graph becomes smooth parabola symmetrical shape.
4. Measure and adjust back side to complete
- After the front side is done, turn the holder around to adjust the back side of the reed.
- Changing the color of the graph line to blue makes comparison easier.
- Adjustment process will be completed after the back side is done.
- Raise the prove lever and remove the reed from the holder.

